Adding Telemetry to the Walkera QR X350 Pro

One of the best features of the X350 Pro quadcopter is that is runs the arducopter firmware making it ideal to hack and mod to gain extra functionality if you want. This guide will show you how to add telemetry to your X350 Pro to unlock a wide variety of features such as the ability to monitor your quadcopters position, and change waypoints only the fly. But the most exciting feature that this will enable is probably the follow me mode that will allow your X350 Pro to autonomously follow you if you are using a smartphone/android tablet.

How hard is this to do?

I would not say that this is a beginner task as it requires you to open up your X350 Pro quadcopter and solder some connectors onto the flight controller. However it is not the most difficult thing to do. For some more tips on soldering you should have a look at our soldering guide here

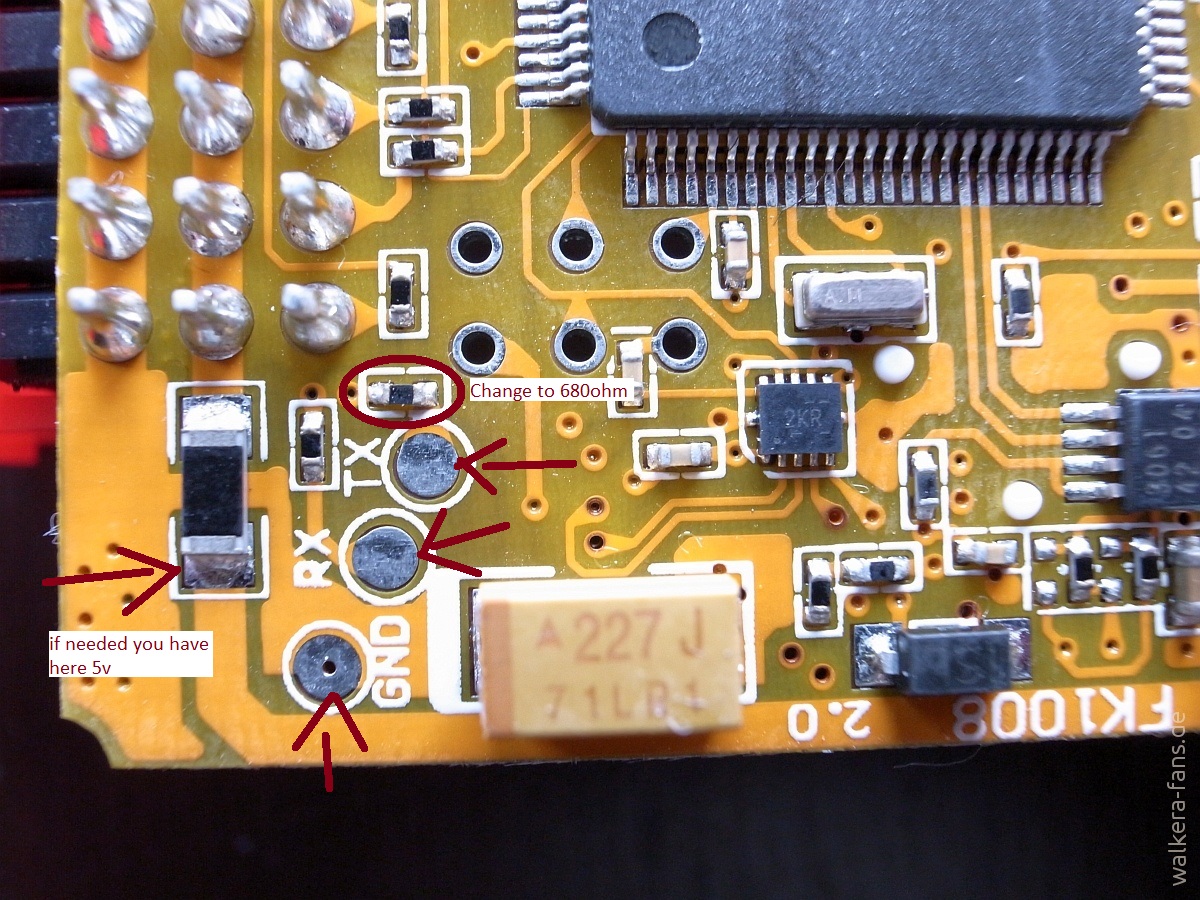
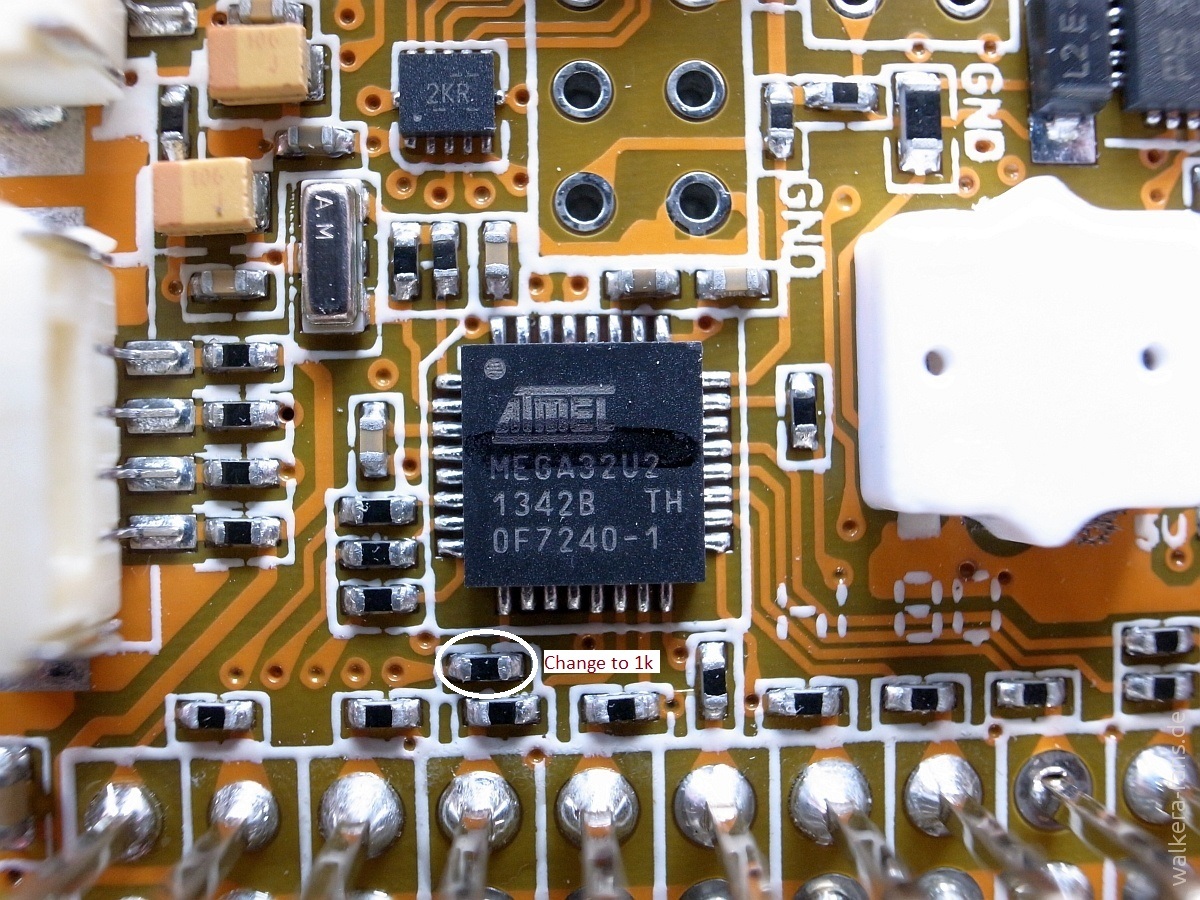
Please note that if you don’t change the resistors you will not be able to get 2 way telemetry, I will update this post soon with further details on how to change the resistors and where to get them. I don’t recommend fiddling with the resistors unless you know what you are doing.

What you will need

  • Soldering Iron and some solder
  • 3DR telemetry module
  • 4 pin connector wire

How to connect everything

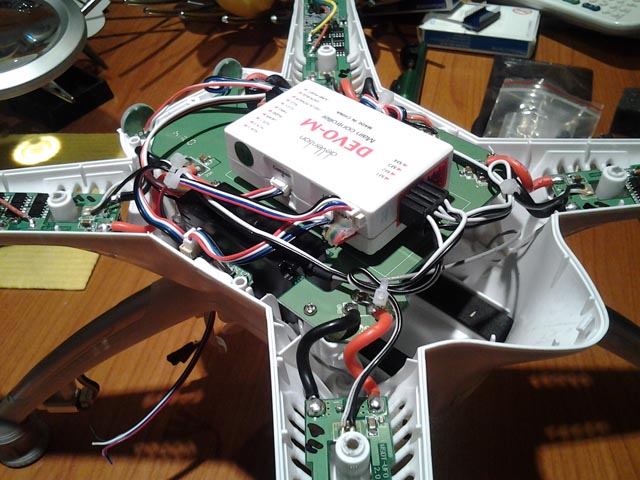
The first thing to do is to open up your X350 Pro by removing some of the screws to remove the top shell. Once this is done you will see the DEVO-M flight controller as shown below.

You will then need to open up the controller case to reveal the flight controller within. On the flight controller PCB you will need to look in the corners for two pads called RX and TX as shown below


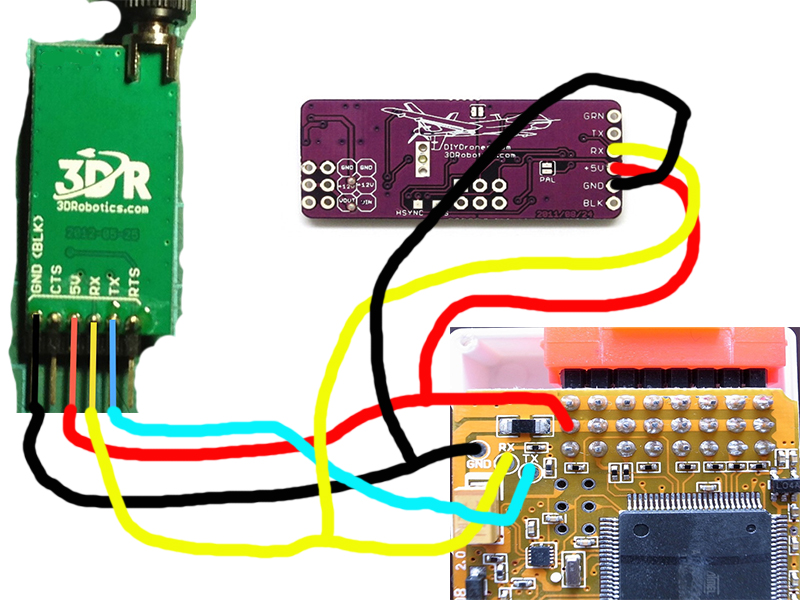
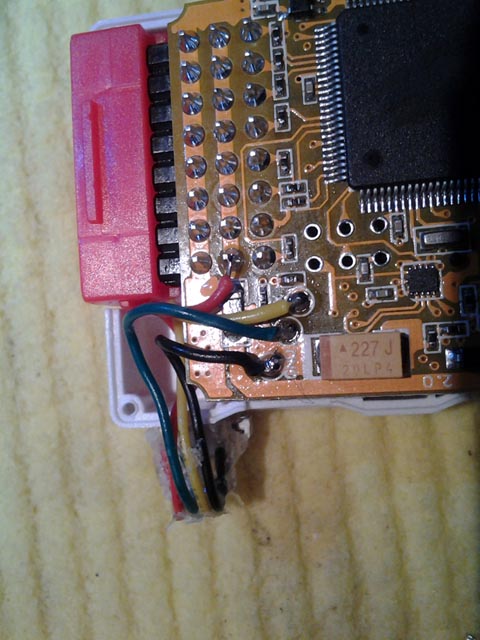
You just need to solder the 4pin wire to the GND, RX, TX and 5V line according to the diagram below. Please note that if you want to also connect a minimOSD board you can do so as it is also shown in the diagram.

Once the wire has been soldered it should look similar to the image below. Please make sure that when you are soldering not to short any of the pins as this could damage your flight controller, particularly when soldering the 5V wire.

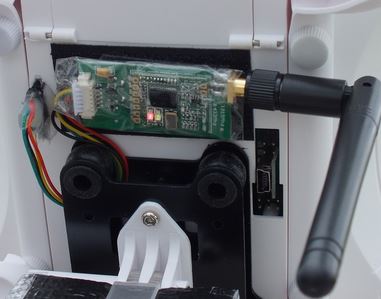
Now that the wires have been soldered its a good idea to quickly check the telemetry module works before packing everything up. If you can connect via mission planner through the telemtry modle then you should proceed to close everything. The last step it to mount the 3DR telemetry module, this is usualy on the bottom of the X350 Pro frame

Thats it! You can now install droidplanner on your smartphone/tablet, connect the ground telemetry module using an OTG cable and you can start to use all of the cool new features like follow me, or even click on a point on the map and your X350 Pro will fly there!.

In this guide I have not included any steps on how to pair your 3DR telemetry modules, but if you have any questions please let me know and I can add the information or answer your questions.

Happy Flying!

4 Likes

Thank you for the guide. I bought the Iris but returned it after way too many problems. I did love the mission planner and wanted something that would work with it. I see the Walkera X350 Pro will do this. but most of all I wanted to add Telemetry. I have just a few questions. Can I buy the Telemetry off of ebay or do I need the one that 3drobotics sells? I am very comfortable with soldering, but can you give me a link to the resistor that you suggested changing? Also if you have any other suggestions please let me know. My main goal is having a lower price Autonomous quad working with mission planner or similar. I may purchase the gimbal or just put my gopro on it. Thanks again

Grandpa Jake

You dont have to use the official 3DR radios if you dont want to, but all the ones off ebay are the older versions, the one shown in the photo is actually one of the older v1 telemetry modules :smile: . As for the resistor, you dont have to change it as many customers have successfully used the 3DR radio with no resistor. But you can find them on ebay if you want to do this.

hello im new here i just bought this item http://usd.dx.com//product/3dr-radio-915mhz-module-w-anteena-for-telemetry-on-apm-2-blue-green-901237645 i have the walkera qrx 350 pro as well i have a video reciever and transmitter with a go pro silver hero 3+ im tryn to make the telemetry display on my 7 inch monitor what conection do i need to make ? can you post a diagram like you did here showing me the signal pad so i can acomplish that please.do i still need to buy a mini osd or can i go from the mega 2560 to telemetry to the video trasmitter?

If you want to display telemetry on your video stream you will need to use an OSD module like minimOSD. However I dont always see the point of this if you already have telemetry connected you can connect your android device/ or laptop and you can view the various telemetry data such as position, altitude, battery remaining on that, but even more useful is the fact that it can read out the values for you so you don’t need to look at it to know your altitude, or remaining battery capacity. This means for video feed is nice and clear so you can enjoy the view from your quadcopter :stuck_out_tongue:

thank you so much i did not know that, so its better to have the telemetry on the droid planner and keep the monitor clear of all telemetry number so i can enjoy the view that i guess it also means less weight on the quad (miniosd) and more flight time thank you !!! so much

I was wondering if it would not be too much a problem, could you maybe give me a link to where I could get the proper telemetry module. Maybe ebay, amazon ? Also is there anything tricky to pair them once it is installed.

if the 350 is sent out on a mission, and it is beyond the transmitter range, will it default to failsafe and return?

last question, is there anything to be aware of when updating or using mission planner?

Thanks for all your help

Grandpa Jake

You can buy an official 3DR telemetry kit from our shop. Otherwise if you prefer to use one of the older versions I can sell you an air module for ÂŁ12 including shipping, if interested please PM me with your details.

As for a mission beyond transmitter range, this is something that you can change in the settings, but default its usually set to return back home, but you can also override this to continue with the mission if you prefer. You can also set other failsafe options like landing when the battery gets low as well. You can also use the geofence feature which will prevent you form flying a certain distance or altitude away from you which is useful too.

I have one of the newer modules that came with my Iris, but not the other. Is it possible to get just one? I was looking at the instructions you had installing it to the walkera but I notice on the one I have which is the newer style there are no labels on the board when I remove it from the shell. So any help would be very much appreciated. See I am heading in for major surgery next week and wanted to get everything ordered so I have a project to work on as I recover.

the only thing that my module says is on the side ID13

Thank you
Grandpa Jake

I purchased the 3DR V2, running droid planner, I get the voice an error: data link lost, and I don’t see any activity in the Droid device

Have you figured out what was wrong? I am hoping to do this with mine once I know if my telemetry module will work

double make sure the gps,compass and transmitter are on and working mine says that but only when i turn off the transmitter by the way im using the nexus 7 tablet i did the steps above and it work thanks to unmannedtech i would not had been able too do it without them

I connected my X350 Pro to mission planner and the first thing I did was to save the factory settings. Then I went to the Geofence and tagged the box to activate it. Exited and then went to see if the motors would arm. They would not, but if I go back into mission planner and unchecked the geofence everything works fine.

Does anyone have some suggestions or can guide me so I can move in the correct direction.

Thank you

Grandpa Jake

Also Rafaello make sure that the Rx goes to the Rx and tx to tx otherwise it won’t work I tried it with the Rx cable going into tx and I get the data link lost so that is probably the problem however my quad connects to the nexus 7 the only thing I’m able to see in the telemetry display is the radio signal percentage live other than that I get the voice notifications when I arm the drone rth and staybilaze but it won’t tell me the battery level on it or if it has GPS hopefully some one can he’ll with it thank you guys

1 Like

The reason why you cant arm in geofence is most likely being caused by the pre-arm checks. Before ir will allow you arm you need to have a solid enough GPS lock. One thing you might want to try to change is the HDOP value in mission planner from 200 to 250, so that the pre-arm check is not as strict in terms of GPS signal. However I suggest that you only try this if you cant get a good GPS lock after waiting several minutes. I had this issue when trying to fly this week so it could be that right now in the UK the GPS signal is not so great for whatever reason.

To change HDOP in mission planner:

  • Config/Tuning --> Full Parameter List and look for the GPS_HDOP_GOOD command. (Click “find” and type “gps” it is much easier to find the command like this)
  • It is set to 200 by default which means 2.00
  • I changed mine to 250 which is 2.50 because sometimes my Hdop can get into 2.3, 2.2, 2.1 etc and still hold a loiter position very well.
  • I would not set it higher than 2.5 though. Over 2.7 or 2.8 you should not attempt any navigational commands such as Loiter, RTl, Auto, Circle etc.
  • Without a good gps lock you should only fly in Stabilize mode.

Thanks, I am going to make that change now and see if it can arm. I do have another question that I hope you can help with. I just connected my Telemetry V1 to my X350 Pro. i then connected the other module to the pc. When I turned it on I noticed a green flashing light and below it a red. On the module that is on the PC it was just flashing green. Once I powered up everything an started Mission planner it seemed to connect as I could see red and green on both modules. I selected 57600

It seems to respond to my mode changes as it speaks the change as i move the switch
but it keeps trying to connect which says in a box. Connecting Mavlink and getting Params (sysid 1 Compid 1 ) that is as far as I can get becuase moments later is say connect failed?

Is there a setting I need to make before it is connected the proper way?

Can you help?

Grandpa Jake

1 Like

By changing the HDOP number I was able to get it to arm :slight_smile: Thanks for that help. I had forgotten that when I had my Iris the same thing needed to be adjusted.

I installed my Telemetry V1 according the instructions here and it seems to work, ALMOST ! I get the connecting red light and after I press connect on Mission Planner I her the voice telling me the mode my switch is in. And if I change the switch it lets me know it has changed. But as this is going and mission planner is still loading parameters it will soon fail?

it starts out Connecting Mavlink and shows getting params but it fails just after?

1 Like

hey i have the exact problem now i connect and then it timees out ? i wonder why a video would be nice if someone gets it working before i figure it out thanks guys for any help with this

Is this when you connect via the android app, or via mission planner? Did you double check your baud rate you connect with is the same as what you configured on your radios?

i figured out and i made a video tutorial to share with you guys now it works with mission planner and the droid planner app i will be uploading in a few hours on here for every one to share thank you unmanned tech