In this guide we will walk you through the initial setup process for your vortex 250 pro FPV quadcopter. It is supposed to be used alongside the main vortex 250 manual. If you have any questions ask them below and one of use will be more than happy to help.
What else do I need to fly the vortex?
The vortex 250 arrives fully assembled but you need to add your own battery and R/C receiver in order to be able to fly your quadcopter. A FPV camera and transmitter are also built into the vortex, but you will also need to use some FPV goggles, or FPV monitor to fly this drone in first person view. However here are our suggestions on the extra equipment needed for the vortex 250.
- Battery - The vortex can pull of 80A during full power climbs so regular batteries are not suitable, you can use either a 3S or a 4S setup depending on your experiance. Just make sure the battry can supply suffienct current to the motors, so a 60C plus battery should be used. For more info on this see our LiPo Battery Guide.
- 3S Setup - Tattu 1300mAh 75C 11.1V
- 4S Setup - Tattu 1300mAh 75C 14.8V
- R/C Radio and Receiver - FRsky Taranis Plus with X4R-SB (preferably bind in CPPM mode) or D4R-ii receiver.
- FPV Goggles - Fatshark Attitude V3 or Fatshark Dominator v3
First time setup

In this video you will go through the entire setup process of setting up your Vortex 250 Pro for the first time using a FRsky Taranis and a D4R-II receiver. The first step it to bind your receiver to your taranis and set your D4R/X4R to output CPPM, this is so that you dont need to modify the included R/C receiver cable on the vortex. In the case of the X4R-SB receiver you should bind it with the jumper across CH2 and CH3.
The video also shows you how to setup a model on your taranis radio for the vortex. In the case of you using the D4R-ii you will need to set the taranis to D8 mode, but if using the X4R receiver (if using EU firmware on your taranis) set it to D16 mode.
Setting up the vortex with Spektrum DX18

Advanced setup

In this video Freybott walks us through some of the advanced settings and pro tuning setups available on the vortex 250 pro. He shows us how this can all be done via the R/C controls and the OSD menu. Settings include setting us the OSD, LED’s, Video TX, Game Setup, Flight Controll, and Pro-tuning.
Using SBUS/Spektrum with Vortex 250
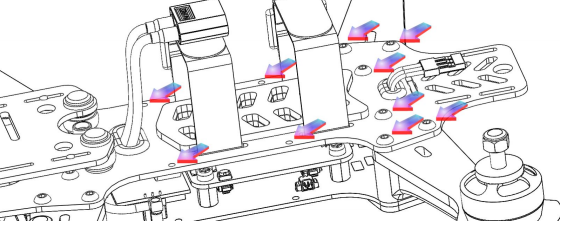
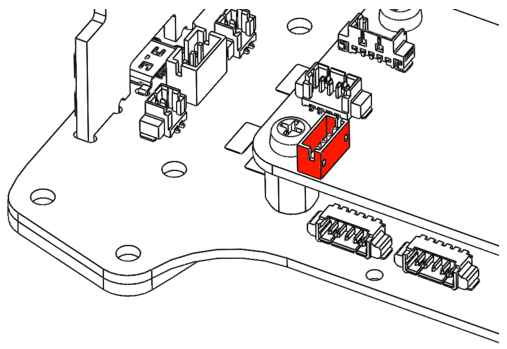
By default the vortex 250 includes a CPPM cable to connect to your receiver, so that is why I suggested you bind your X4R-SB receiver in CPPM mode. However if you want to use SBUS/Spektrum you will need to open the vortex up and install the Vortex Spekrum cable. For full details see the official vortex 250 quick start guide This involves removing 10 screws on the top of the frame so that you can access the flight controller board to plug in the SBUS cable.