Hello,
regards to improve the range I’d like to change the RC receiver (original frsky d4r-ii) to an other. maybe FRSKY X8R 8/16CH S.BUS ACCST would be a good choice. my question is: need to upgrade the receiver firmware to ppm output or just plug and play (naturally after binding)? if yes, pls show tutorial link for me.
thanks,
bela
perhaps also good the frsky D8R-XP. i read this no need to update firmware just jump 3-4 signal port. do i think good?
Hi
The X8R, or L9R with a antenna mount will be good options if you are looking for abit more range. Both the X8R and L9R are compatible with SBUS so you can connect them directly with the pixhawk autopilot on your IRIS+ without needing to change any firmware.
The best option would be to upgrade to the X8R if you want extra range as it is compatible with eh DJT TX module on your IRIS radio.
However if you use the L9R receiver you will need to upgrade the transmitter on your IRIS radio since its not compatible with DJT TX units, or you can use a Taranis.
Thank You Alex,
it is a good advice.
keep in mind the standard controller is not compatible with the FrSky X series
Hi
I’m just got an frsky D8R-XP receiver to change the original D4R-II. (My D4R-II don’t work). I’m confused about install the new d8rxp to the board. I read connect CH3 and CH4 with jumper and CH1 will work as cppm output. it is ok. I don’t understand what about the telemetry port. there are green(rx) red(tx) and black(g) colour wires ends white connector which is ok for D4RII but no suits for D8RXP. what can I do that d8rxp suit well to my riris+?
Both the D8R and D4R telemetry pins works the same. The only difference is that the D8R has a few extra pins since its bigger. So you have two Analogue pins whereas the D4R only has one.
The two images below show the pinouts for the D4R and D8R receivers.
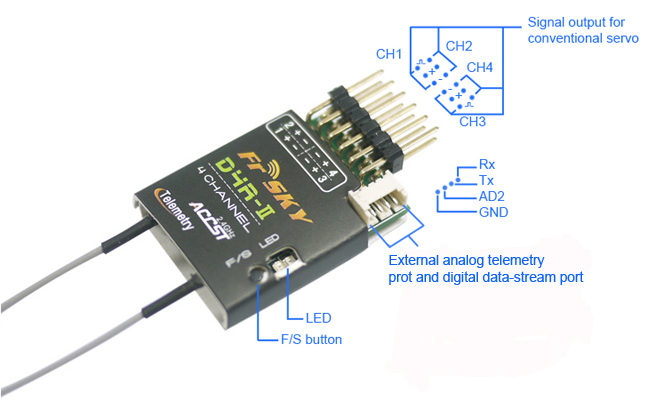

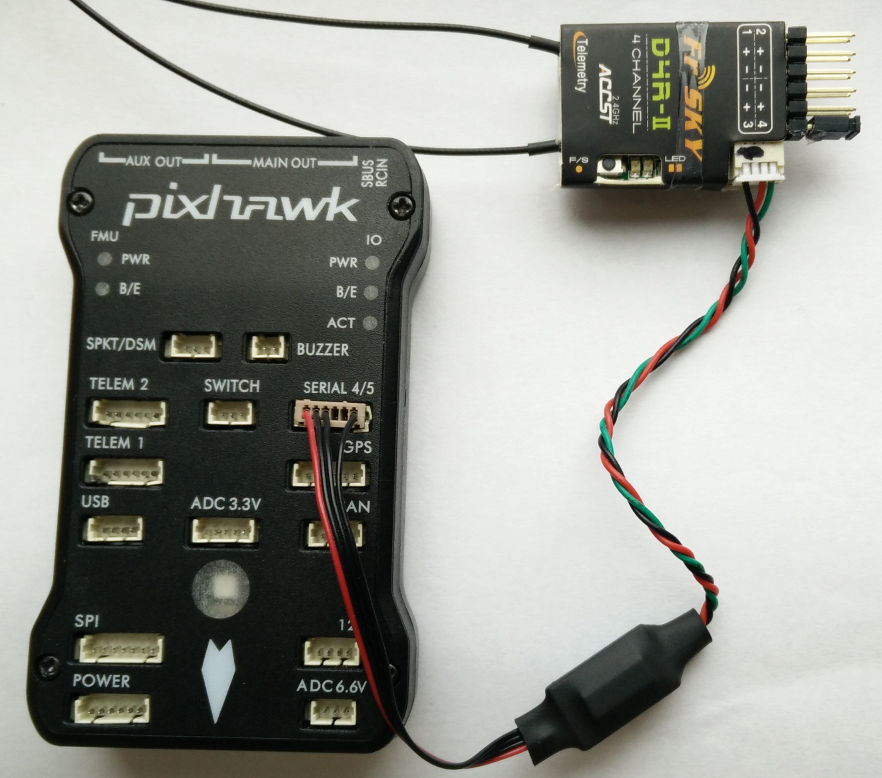
So all you will need to do is change the white connector (or solder) to a regular 3 pin servo connector and make sure the green wire goes to the RX pin on the D8R, the red wire should go to the TX pin on your D8R and lastly the ground should go to the top G pin (ground) on the D8R.
Here is a photo of the D4R connected to pixhawk so you know what the colours mean.
Hope that helps
You are Great! Thank You.
Thx again! I think I will going to prosper but become quickly clear that i need some extra connector lenghted servo cable and crimping tool. a new question appeared: the d8rxp more bulky than d4rII and no possible to place it to the original place (maybe need to cut out the top shell) but there is huge place in front of the board next to the telemetry modul. shall i worry about any interferency between these units? i decided going to lead the antennas outside the sheel and fix on the front arms.
It is best to keep the R/C receiver antennas away from other so that they get the best reception. However you can still mount the module itself next to other equipment, and most of the time it will be fine, but its a good idea to do a range check if you are uncertain.
Also your telemetry module should be fine since I assume it works on a different frequency?
My other modification idea…
I’m not so satisfied with the original GPS module on the Iris+ board. Slow initialization, high hdop (or significanty higher than other receiver eg. my motog phone or spectra mm data collector). There are many module in the shop eg. UBLOX NEO-M8N and the nice foldable mass mount. According to gps and uav forums the ublox 8 has very good accuracy and fast ini…exactly what i need. from an other view higher accuracy very important if i’m going to make georeferenced aerial photographs. Please correct me if my thinking on wrong way…My question is: How simple to install the new unit? is it enough to plug into my pixhawk FC and we are ready? (I think need to calabrate the compass)
Thank You again,
bela
Hi
Its fairly easy since IRIS+ uses a standard Pixhawk controller, so you just need to figure out a good way to mount the Ublox M8N GPS mode to it. It should work better since the M8N can connect to both GPS and GLONASS sattelites whereas the LEA-6H on the IRIS can only use GPS network.
Thank You Alex,
The offered M8N equipped with 6 pin connector for pixhawk as default?
Our current batch have a 5 pin connector, but all our modules include a spare connector so its compatible with APM and Pixhawk systems.
However if you want we can swap the GPS connector for you as its a quick thing to do, just send us an email with your order number once you place the order and we can do that for you before we send it out.
I saw on diydrone some solution for mounting the ublox8. two other questins appeared. need it to place high (16 cm) level or lower level may as good? the 2nd one: somebody wrote that no need to unmount the older gps but i don’t understand it because of there is one place on the pixhawk to plug in gps (maybe something can be misunderstood for me)
It should not make a huge difference mounting the gps module higher up, but it is normally Better to do that if you can. But its more important to have a secure GPS mount that is alaobeasy for you to transport your IRIS around.
Yes it it is possible to use dual GPS modules with pixhawk, you just need to connect the second GPS to the serial 4/5 port as a shown below
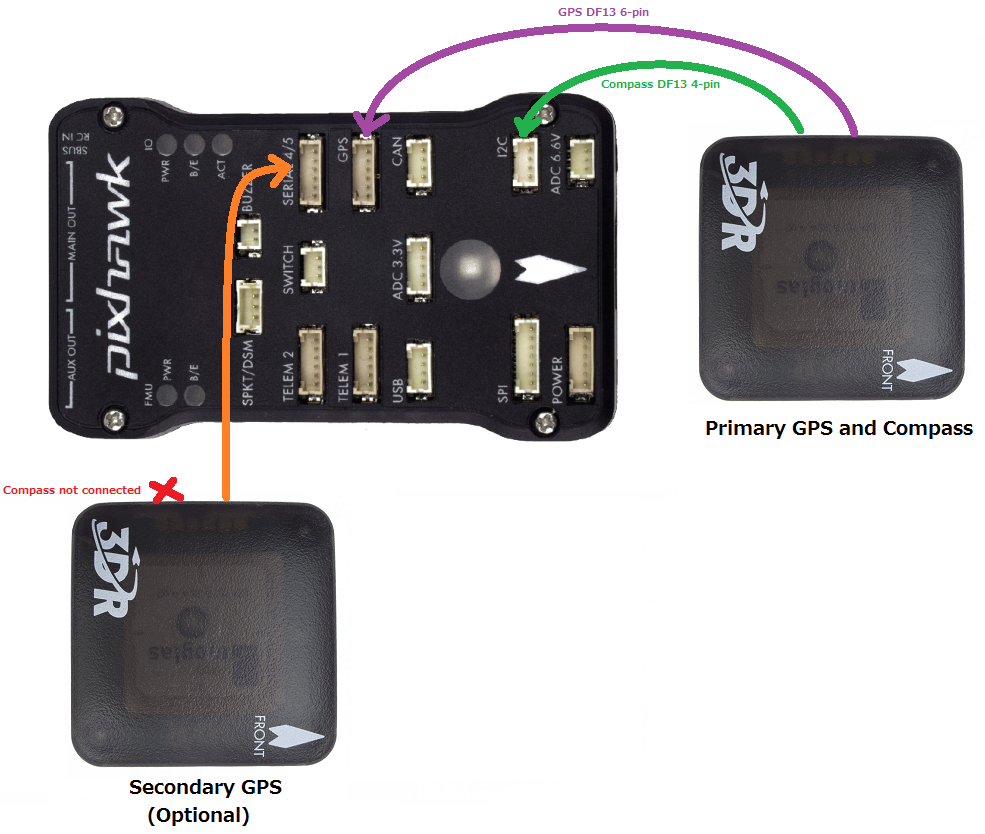
You will also need to enable the second GPS on the mission planner
hello,
it is time to install my new ublox 8m (from unmanned tech) onto the iris board. original gps chip (ublox lea6) has 6 pin connector for pixhawk gps socket. it is ok, but the original lea6 compass lead at first to I2C splitter and will go from here to the pixhawk I2C plug. the new ublox 8m has only two wire from the compass, the original is 4. shall i plug in the ublox 8m two wired connector to the splitter or direct into the pixhawk? and what about 4 wire vs 2 ones?
or
leave the lea6 as is first unit and p8m plug into the pixhawk serial 4/5 port and use it as secondary one?
thank you
p.s. should i to do something in mission planner to adjust the second unit?
Hi the I2c cable on our ublox only has 2 wires as the compass on the GPS module already has power from the main GPS connector. The outer two wires are for power and ground. You can plug it into either the i2c splitter or directly into he pixhawk, but best to use the splitter
the ublox m8 gps are great see 10-12 sattelites and has very low pdop. (in the room)
but I have no succes with receiver changing.
0. connect receiver 1 (cppm) socket with pixhawk rc in socket
- binding was succesful
- there is just green led on d8r-xp
- it seems only one way communication
- because of it i can not calibrating radio, in the mission planner relevant page shows the radio channels bars which are totally grey
- i have no idea what is the problem (telemetry port no connections under bindig nor test.
return and rebind the original d4r-ii receiver.
binding succesful but just the green led is light, two way communication is ok, radio status bars are green and you can calibrating, but very poor range (it was my original problem)
i found similar problem in hobbyking forum
https://www.hobbyking.com/hobbyking/forum/forum_posts.asp?TID=52023
small adds
before the range problem occurs the receiver leds (red and green) were in ON together. and there were no problem with d4rii range (300-400m)…i didn’t go farther.