The LiveView FPV Kit for GoPro is a complete kit that allows you to add a FPV setup to your IRIS+. This is a guide taking you through the setup, that only takes a few short minutes. If you are interested in buying this kit, it can be found here.
Transmitter Assembly
Attach a velcro strip to the flat side of the video transmitter (NOT side with digital display) to prepare it to mount to the copter. Connect a transmitter antenna (marked TX on enclosure) to the transmitter.
The transmitter has two ports: a two-wire port and a five-wire port. Connect the black connector on the splitter cable to the transmitter’s two-wire port. The transmitter’s five-wire port will connect to the GoPro video cable that comes with the Tarot T-2D gimbal kit. On the end of the GoPro video cable with two connectors, select the connector with the more widely-set wires. Orient the connector with the metal pins facing in the same direction as the front of the transmitter, and connect to the 3 pins to the right of the transmitter’s five-wire port.
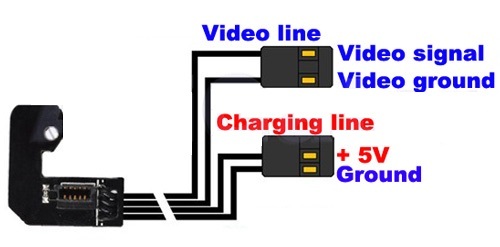
Regarding this image, the ground cable should connect to the ground pin labelled on back of transmitter box. The same applies to the video signal. <img

IRIS+ Mounting
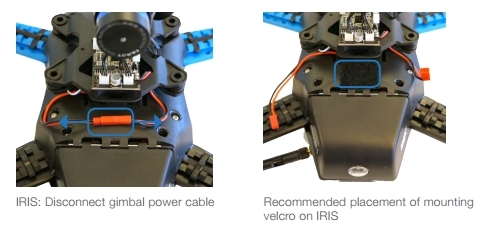
Choose a position on the shell to mount the video transmitter, and attach the second piece of velcro there. You can mount the transmitter anywhere on the shell where it will not obstruct the propellers or interfer with the battery door. We recommend placing it between the gimbal interface place and the battery door; make sure to place it close enough to the gimbal plate so that the battery door can fully open.
Locate the gimbal power cable on the underside of IRIS, and disconnect the two red connectors. This is where you will connect the splitter cable to power both the gimbal and the video transmitter off the flight battery.
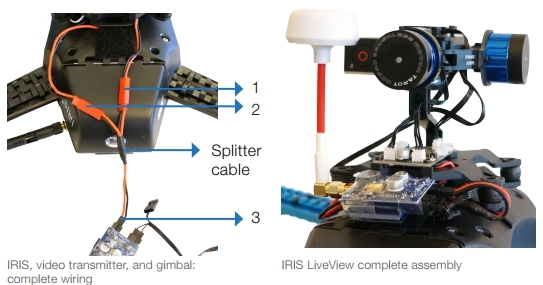
Connect the splitter cable to both red connectors. The splitter cable should now be connected to (1) the red connector on the gimbal power cable, (2) the red connector on the IRIS power cable, and (3) the video transmitter. Secure the two velcro strips together.
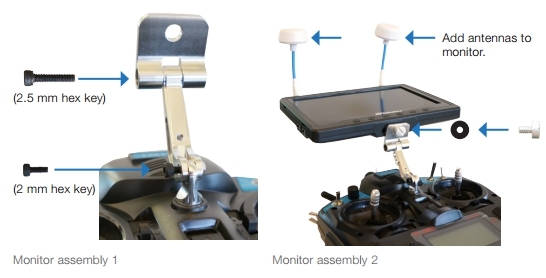
Monitor Assembly
Attach both ground antenna (the ones marked with RX on the enclosure) to the monitor.
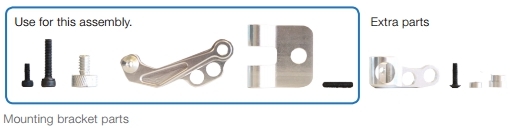
The monitor mounting bracket includes extra parts for attaching to different controllers. To mount to the IRIS+ or X8+ controller, use only the parts outlined below.
To mount the monitor to the controller, insert the larger black screw into the hinge between the two silver parts. Then position the bracket over the controller’s neck-strap attachment, and insert the smaller black screw. Add the black washer to the silver screw, and attach to the monitor using the threaded insert in the bottom of the monitor.
And there we have it; a complete guide on how to attach the LiveView FPV Kit for GoPro to your IRIS+.