The performance and stabilization of your arducopter drone largely down to the PID gains set on your autopilot. But since every vehicle is different there are no set of universal PID gains, since each motor and ESC combination will produce different effects. So although the default PID settings out of hte box will probably be OK for most drones, it will not produce the best possible rock solid performance. Fortunately to make things easy from Arducopter firmware 3.1 and above, we have the autotune feature will find the optimum gains for us while in flight. This is particularly useful for DIY drone builders.
When in autotune mode, the flight controller will twitch the aircraft to measure its responce to figure out the best stabilise PID settings in order to achieve the least overshoot with fastest responce (full details are in our PID gains in a nutshell guide). The only limitation of the Autotune feature is that you need to have a flyable quadcopter, and that you need to perform autotune on a calm day in a large open area. Preferable in a large sports hall if possible.
How to run Autotune
In order to run arducopter autotune, you will need to be in the ALT-hold flight mode. And the autotune mode it set via the channel 7 auxiliary mode switch, so you will need to have a 7 channel or more radio.
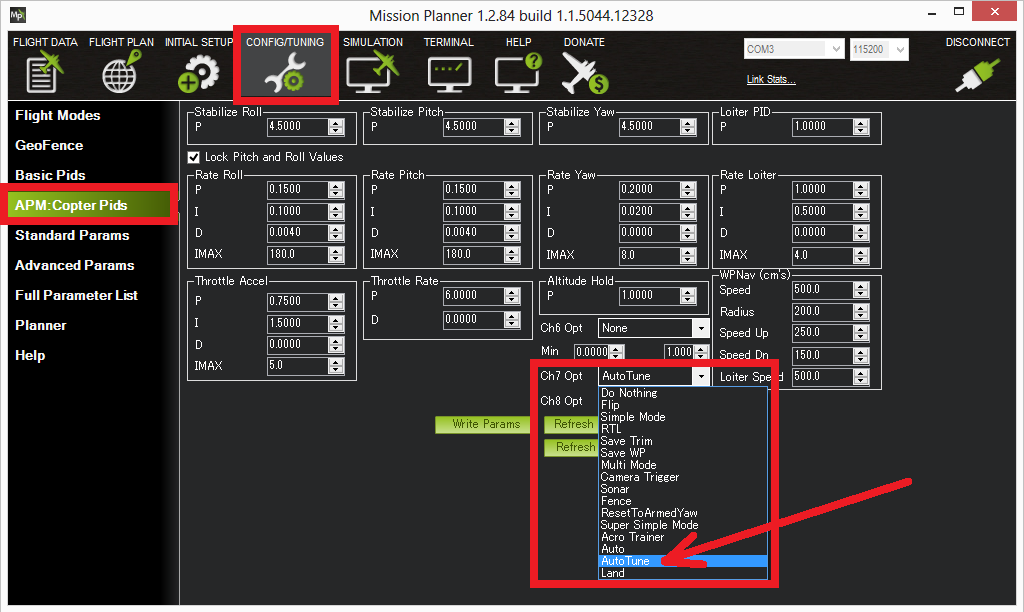
- The first thing to need to setup is the auxilary mode switch to Auto Tune via mission planner. This is done in mission planner on the Config/Tuning>APM:Copter PIds>CH7 Opt field as shown below:
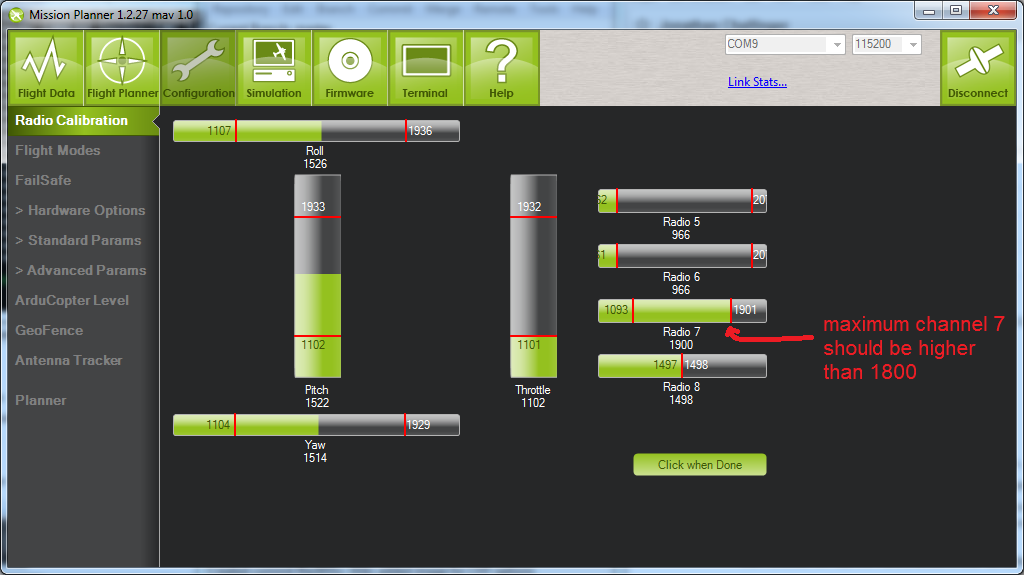
- Double check your CH7 options so that the switch is in the Low position or OFF, Because you need to take off with CH7 in low in order for autotune to work. You can check this via the radio calibration screen.
- To run the autotune process you will need to wait for a very calm day with no wind, and you need to be in a large open area.
- Once your drone is in the air and hovering in AltHold mode you can swt the CH7 switch to high, (on) for arducopter to enter automatic tuning mode.
- During this process the multi rotor will twitch about 20 degrees left and rightt for a few minutes, and forward and back for a few minutes untill the PID’s are dialed in. As of Arducopter 3.3 the yaw axis will also be tuned.
- During the autotune process you can still use the roll and pitch controls to take over control in case your multirotor drifts too far away. When you release the sticks the auto tune process will continue.
- After a few minutes the quadcopter will enter back into a stable hover in AltHold flight mode.
- You can now move the sticks again and you should notice the copter being much more responsive as the now PID’s have been saved. If you are not happy with the PID’s move your CH7 switch back to low to revert the PIDs.
- To save the new PID’s simply land your multirotor and disarm to save the values.
AutoTune Tips
- The autotune will take about 10 minutes or longer to complete, so its important to have a sufficiently charged battery to complete the entire process. However if your drone cant fly long enough you can tune only a specific axis on each flight, see below for more details.
- Sometimes auto-tune will not be able to find a suitable tune, this could be due to your arms being too flexible, or if you have very soft damping on your flight controller mount. If this is the case you can try to change the
AUTOTUNE_AGGRparameter via mission planner (between 0.05 to 0.10) as a higher value is more tolerant to frame flex. However a lower value will mean your drone is more responsive to pilot input. - At any time during the autotune process, you can move the sticks on your R/C controller to take over control which will pause the auto tune, which is useful if your drone is getting too far away. As soon as the sticks are returned to the neutral position the automatic tuning process will resume.
- For optimum results, you should not let your multi-rotor gain too much speed as it it twitching from side to side during tuning. If your copter is drifting you can move your stick in the opposite direction to stop the drift.
- If you only need to tune a specific axis you can change the
AUTOTUNE_BITMASKparameter. Setting it to 1 = tune roll axis, 2 = tune pitch axis, 3 = tune yaw axis. By default the value is set to 7 = tune all axis. This is usefull if your drone cannot fly for long enough to tune all 3 axis. Allowing you to tune one, then swap the battery and tune the other axis. - It is possible to engage autotune while you are in Stabilise flight mode, but you should make sure you are in AltHold or else your copter will not maintain altitude during the tuning process.
- As of Arducopter 3.3 you can now set autotune as an actual flight mode.
Arucopter Autotune Demo Video
 with \"3DR Pixhawk\" board")